

Until recently I'd never heard of cake pops. Then they showed up in Baking Heaven and I was intrigued. A little while afterwards I was reading through one of the cake books I got for my birthday last year and there they were again. And then I've been perusing various baking blogs and they were there too! So when my first sponge for the flowered birthday cake didn't quite turn out how I wanted but still tasted great I knew I wanted to use it when I tried my own hand at it. And today there was another birthday party which was the perfect excuse. So yes, the sponge used for this cake comes from that recipe, though I only used two eggs and my boyfriend ate a bit so in the end I only had about 260g of cake. Despite that though I got 41 pops.
The recipe ended up being a mish-mash of a couple of recipes from the magazine and the book. I had to adjust amounts and such because I didn't have the same amount of sponge and I wanted to mix up the toppings. Admittedly, when making these I missed an important part of the method. I really don't know how I failed to read it in all the recipes. After shaping the balls I should have put in the fridge to firm up before putting the sticks in. I didn't and consequently I lost a few when decorating because they were not strong enough to support the weight. I also wouldn't recommend toothpicks. You definitely need thicker sticks, like lollipop sticks, to support the weight. Nothing with pointed tips because that amount of weight on a tiny point means that the balls can slide down and sometimes split. Very annoying!
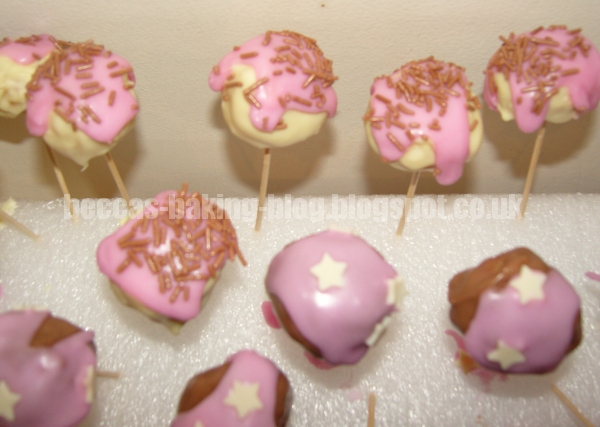
General consensus was that these were very yummy. Personally I thought the white chocolate ones were the best, even though the milk chocolate were more popular. When I make them again I want to make dark chocolate ones too. Obviously, adjust the amounts of chocolate to 80g/2.75oz of each type for that.

Recipe - made 41 cake pops:
- 260g/9oz vanilla sponge
- 1-2 tsp vanilla extract
- 65g/2.3oz unsalted butter
- 90g/3oz icing sugar
- 120g/4oz white chocolate
- 120g/4oz milk chocolate
- Another 100g/3.5oz icing sugar
- Pink food colouring (or colour of your choice)
- A little bit of water
- Decorations of your choice (I've got chocolate sprinkles and white chocolate stars)
- Lollipop sticks or something similar (don't use toothpicks/cocktail sticks)
- Something to hold them in, like a polystyrene block
- Put the butter and first lot of icing sugar in a bowl with the vanilla extract and beat until smooth and creamy.
- Add the sponge and mix well to combine evenly with the buttercream.
- Put some greaseproof paper on a tray or two, it needs to be able to fit in your fridge.
- Take 2 teaspoons of sponge mix, make into a ball and place on the tray. Repeat until you run out of sponge. You should get about 40 balls.
- Put the balls in the fridge for 30 minutes to an hour so the balls firm up. (In bold because I forgot this bit).
- Melt the chocolate in two separate bowls over hot water.
- Take the trays out of the fridge, dip the tips of the sticks in the chocolate (half in one and half in the other) and insert one into each ball. Put the trays back in the fridge for about 10 minutes so the chocolate sets and the balls are secure.
- When you think they are secure, take them back out and dip half the balls in the white chocolate and half in the milk chocolate. Stick them in your polystyrene block (or equivalent) after you dip each one. If you have trouble with the dipping (such as they fall off like mine did) you can put it on with a spoon instead.
- Let the chocolate set. If you can fit it in your fridge, put it in since it'll set faster.
- Make up the icing with the second lot of icing sugar. Add a couple of drops of colouring before the water. Then add the water a little at a time until you get a good consistency. You don't want it too runny or it will go everywhere. It should just be able to pour off your spoon.
- Take out the set balls and put a bit of icing on top of each, easing it down the sides if necessary.
- Add your decorations.
No comments:
Post a Comment