


I am thinking I need to make myself a schedule as to when I put together my blog updates. I've had a few occasions recently where I have let entries I intend to post build up. Admittedly only two or three at a time, and usually when I do a lot of baking in a short space of time, but that's still not really an excuse. Being busy with work might count, since I've gotten full time hours at the school until the summer, but my evenings are rather empty. They have been spent stressing about all manner of things though and that tends to put a damper on me doing anything. So yes, schedule. Maybe if I set myself arbitrary deadlines it will help me keep on top of things. We'll see. Of course, it would only follow a bake, which currently are few and far between.
Anyway, jaffa cupcakes. This was a bake for the Dundee group and one that was requested. I'd seen plenty of jaffa cupcakes, most of which had some sort of marmalade filling and a chocolate buttercream. However, I remembered seeing one that put orange jelly (as in gelatin, not jam for you Americans) on top and then melted chocolate. That's the one I wanted to do, though I did check with the fiancé first. I guess it is actually a jaffa cake itself. An added request to this cake was to have a jaffa cake in the base of each one. So it's a jaffa cake topped with another larger jaffa cake (since the term 'jaffa cake' is not trademarked by McVitie's).
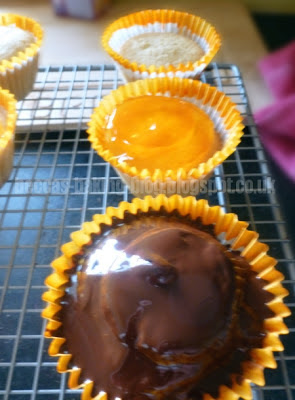
The construction is fairly simple. First there is a McVitie's Jaffa Cake placed in the base of each cupcake case. It occurred to me after I had bought the jaffa cakes that I should have gotten the mini ones. They would have fit in the cases perfectly. Ah well. I made do with my regular sized ones and used a cookie cutter to make them the right size for the cases. Next is a pretty basic vanilla fairy cake. This is topped with a two discs of orange jelly mixed with marmalade. I made them by chilling the jelly mix in a baking tray and then cutting out the discs with two cookie cutters. I did two sizes of discs to stack in the hopes of getting the kind of bump you see in the middle of jaffa cakes. The fiancé thinks that may have been too much jelly though so it's up to you if you want to do that too. Finally, each cake is covered in melted dark chocolate and left to set. Admittedly, I really should have let my jelly come to room temperature and let my chocolate cool slightly before I poured it on. Once it was set it started to develop condensation, which isn't an issue taste wise but is not the most attractive thing to see.

As you may know by now, I do like to try and get a nice, overall aesthetic by using cases that match the cakes. For Jaffa Cakes, I really wanted orange cases. However, I do not have any in my cupboard, despite my ridiculously large collection of cupcake cases. I considered blue, but didn't think it would look right. Then I had an idea! I remembered seeing somewhere (probably Pinterest) that I could use food colouring to dye white cases. So that's what I did. I made up a bit of orange colouring then dipped the rims of white cases in it and left them to dry. The final result was quite nice. Certainly much better looking than having just white cases. I'll be doing it again I think, when I require other colours that I don't own.
Final verdict? Well, on his initial tasting the fiancé thought there was too much jelly, and a bit too much marmalade mixed into that jelly. Not that it was bad but he said a jaffa cake has a fairly compressed layer so a slightly thicker, squishier layer was a bit weird. However, on the way to Dundee the chocolate and jelly melted somewhat in the heat and then reset. This apparently condensed the jelly down into a layer more akin to that of the McVitie's Jaffa Cakes. Otherwise, general opinion was that they were yummy and did indeed taste like jaffa cakes. I still think I would change things a little next time, like using less marmalade and making sure the temperature of the jelly and the chocolate are not too different when I put the chocolate on the cake.

Recipe - makes 14

- 14 mini jaffa cakes (or regular ones cut to size with a circular cutter)
- 125g/4oz butter
- 125g/4oz golden caster sugar
- 2 eggs
- 150g/5oz self-raising flour
- 3 tbsp milk
- 1 tsp vanilla extract
- Preheat the oven to 180°C/350°F/Gas Mark 4 and line 14 compartments of muffin tins with buffin or muffin cases.
- Put a jaffa cake in the bottom of each case, chocolate side up.
- Put the butter and sugar into a bowl and beat together until smooth and creamy.
- Add the eggs one at a time, beating in after each addition.
- Fold in the milk, flour and vanilla extract until smooth.
- Split the mixture evenly between the cases, filling about two thirds full. Make a dip in the centre of mixture in each case with a spoon so that the final cakes should be flat.
- Bake for 15-20 minutes until risen and the tops are slightly springy.
- Leave to cool on a wire rack.
Jelly Topping - inspired by Ella Valentine via Baking Heaven Volume 2
- 1 x 135g/4.75oz packet of orange jelly cubes (gelatin)
- 2 tbsp marmalade
- 300ml/10.5fl.oz boiling water
- Line a 33x23cm/13x9inch tray with aluminium foil.
- Mix the jelly cubes with the marmalade and boiling water until dissolved.
- Pour into the lined tray and make sure it spreads evenly.
- Put in the fridge to chill for a couple of hours.
Assembly:
- 150g/5oz dark chocolate
- Remove the jelly from the fridge and allow to come to room temperature.
- Melt the chocolate in a glass bowl placed over a pan of gently simmering water, taking care not to let the water touch the bowl. Make sure you stir it occasionally. When melted, remove from the heat and allow to cool somewhat.
- Use a circular cookie cutter that has a slightly smaller diameter than the top of the cake and cut out circles of jelly. Use a spatula to transfer them over to each cake, laying them on top.
- If you want two layers of jelly, use a smaller circular cutter to cut out more jelly circles and place them on top of the first ones.
- When the chocolate has cooled but is still runny, use a spoon to pour it over the top of the jelly on each cake. You want to cover all the jelly so you may need to coax it gently into the corners.
- Leave to set.
No comments:
Post a Comment